Project History!
The intention of this post is to serve as an aide-memoire for a little project I’ve been working on recently.
From time to time, I lead worship at my church, and play acoustic guitar. For song lyrics / chord charts I use a popular app on IOS called Onsong.
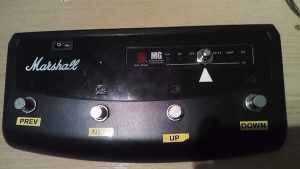
A while ago I found an old guitar foot switch unit that started life belonging to a Marshall amp. I took most of it’s inwards out and wired up a simple Bluetooth keyboard to the 4 main switches, and then in turn, paired this with my Ipad. Within Onsong settings, I configured the footpedal options to respond to “keyboard” presses – u = Up, d = down, n = next song .and p = previous song.
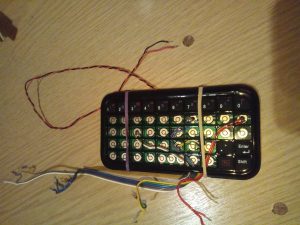 So far so good…..apart from one bug-bear. When IOS detects an external keyboard, it disables the on-screen keyboard functionality – a feature I use to add sticky notes, edit chord charts and so on.
And thus this project was born….to find a better way of doing this. The result ? An Arduino based board that transmits MIDI notes over Bluetooth Low Energy.
The Arduino board I used is an Adafruit Feather M0 Bluefruit LE – https://www.adafruit.com/product/2995 coupled with a small 3.7v LiPo battery (https://www.modmypi.com/raspberry-pi/power-1051/li-ion-and-lipo-1053/lithium-ion-polymer-lipo-battery-3.7v-140mah)
Now, I am the first to admit that I am not a “programmer” by any means and so the Arduino sketch part of the project contained much stumbling in the dark – along with lots of cross referencing to the following guides:
https://learn.adafruit.com/adafruit-feather-m0-bluefruit-le?view=all
https://learn.adafruit.com/wireless-untztrument-using-ble-midi/overview-uniontownlabs
https://io.adafruit.com/blog/tip/2016/12/14/feather-power-switch/
The first challenge I had was that my board needed a firmware update to enable the Midi functionality properly…nothing like an Arduino baptism of fire. Fortunately though, there are easy to follow instructions here: https://learn.adafruit.com/adafruit-feather-m0-bluefruit-le?view=all#dfu-bluefruit-updates
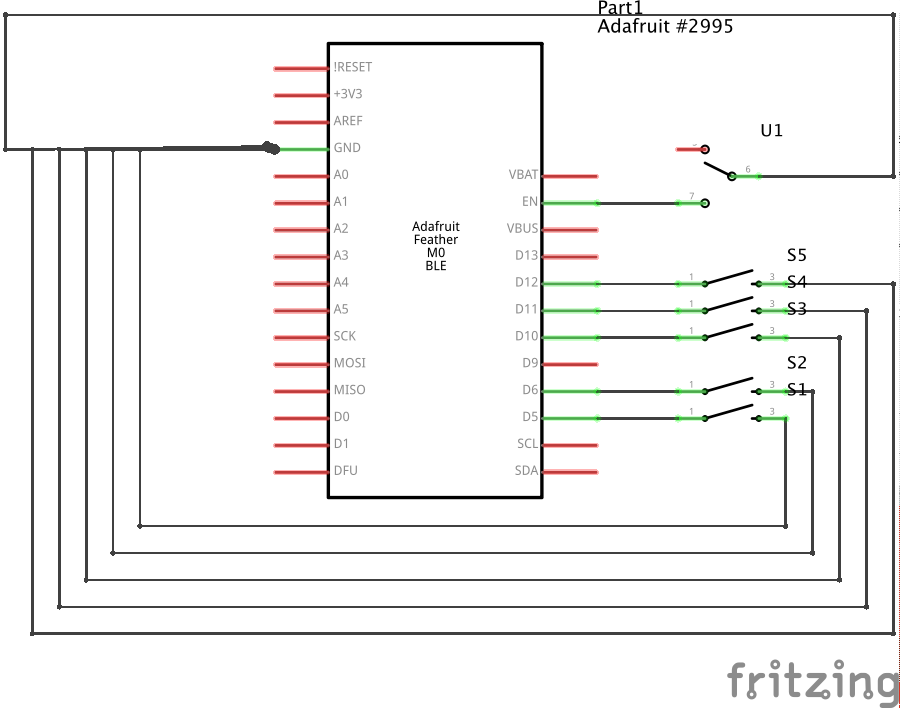
Schematic:
I have chosen to use 5 momentary switches for Up, Down, Next Song, Previous Song and Pad track Start/Stop Toggle (I control volume with a passive volume pedal)
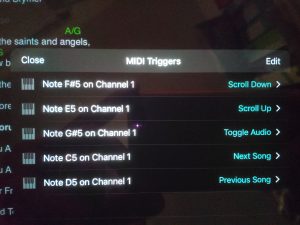
Onsong settings
Demo
Arduino Sketch
#include <Arduino.h>
#include <SPI.h>
#include "Adafruit_BLE.h"
#include "Adafruit_BluefruitLE_SPI.h"
#include "Adafruit_BluefruitLE_UART.h"
#include "Adafruit_BLEMIDI.h"
#if SOFTWARE_SERIAL_AVAILABLE
 #include <SoftwareSerial.h>
#endif

#include "BluefruitConfig.h"

#define FACTORYRESET_ENABLE 1
#define MINIMUM_FIRMWARE_VERSION "0.7.0"

// Create the bluefruit object, either software serial...uncomment these lines
/*
SoftwareSerial bluefruitSS = SoftwareSerial(BLUEFRUIT_SWUART_TXD_PIN, BLUEFRUIT_SWUART_RXD_PIN);

Adafruit_BluefruitLE_UART ble(bluefruitSS, BLUEFRUIT_UART_MODE_PIN,
 BLUEFRUIT_UART_CTS_PIN, BLUEFRUIT_UART_RTS_PIN);
*/

/* ...or hardware serial, which does not need the RTS/CTS pins. Uncomment this line */
// Adafruit_BluefruitLE_UART ble(BLUEFRUIT_HWSERIAL_NAME, BLUEFRUIT_UART_MODE_PIN);

/* ...hardware SPI, using SCK/MOSI/MISO hardware SPI pins and then user selected CS/IRQ/RST */
Adafruit_BluefruitLE_SPI ble(BLUEFRUIT_SPI_CS, BLUEFRUIT_SPI_IRQ, BLUEFRUIT_SPI_RST);

/* ...software SPI, using SCK/MOSI/MISO user-defined SPI pins and then user selected CS/IRQ/RST */
//Adafruit_BluefruitLE_SPI ble(BLUEFRUIT_SPI_SCK, BLUEFRUIT_SPI_MISO,
// BLUEFRUIT_SPI_MOSI, BLUEFRUIT_SPI_CS,
// BLUEFRUIT_SPI_IRQ, BLUEFRUIT_SPI_RST);

Adafruit_BLEMIDI midi(ble);


bool isConnected = false;
int current_note = 60;

// A small helper
void error(const __FlashStringHelper*err) {
 Serial.println(err);
 while (1);
}

// callback
void connected(void)
{
 isConnected = true;

Serial.println(F(" CONNECTED!"));
 delay(1000);

}

void disconnected(void)
{
 Serial.println("disconnected");
 isConnected = false;
}

void BleMidiRX(uint16_t timestamp, uint8_t status, uint8_t byte1, uint8_t byte2)
{
 Serial.print("[MIDI ");
 Serial.print(timestamp);
 Serial.print(" ] ");

Serial.print(status, HEX); Serial.print(" ");
 Serial.print(byte1 , HEX); Serial.print(" ");
 Serial.print(byte2 , HEX); Serial.print(" ");

Serial.println();
}

void setup(void)
{
 // while (!Serial); // required for Flora & Micro
 delay(500);

Serial.begin(115200);
 Serial.println(F("Adafruit Bluefruit MIDI Example"));
 Serial.println(F("---------------------------------------"));

pinMode(5, INPUT_PULLUP);
 pinMode(6, INPUT_PULLUP);
 pinMode(10, INPUT_PULLUP);
 pinMode(11, INPUT_PULLUP);
 pinMode(12, INPUT_PULLUP);
 pinMode(13, OUTPUT);

/* Initialise the module */
 Serial.print(F("Initialising the Bluefruit LE module: "));

if ( !ble.begin(VERBOSE_MODE) )
 {
 error(F("Couldn't find Bluefruit, make sure it's in CoMmanD mode & check wiring?"));
 }
 Serial.println( F("OK!") );

if ( FACTORYRESET_ENABLE )
 {
 /* Perform a factory reset to make sure everything is in a known state */
 Serial.println(F("Performing a factory reset: "));
 if ( ! ble.factoryReset() ) {
 error(F("Couldn't factory reset"));
 }
 }

//ble.sendCommandCheckOK(F("AT+uartflow=off"));
 ble.echo(false);

Serial.println("Requesting Bluefruit info:");
 /* Print Bluefruit information */
 ble.info();

/* Set BLE callbacks */
 ble.setConnectCallback(connected);
 ble.setDisconnectCallback(disconnected);

// Set MIDI RX callback
 midi.setRxCallback(BleMidiRX);

Serial.println(F("Enable MIDI: "));
 if ( ! midi.begin(true) )
 {
 error(F("Could not enable MIDI"));
 }

ble.verbose(false);
 Serial.print(F("Waiting for a connection..."));
}

void loop(void)
{
 // interval for each scanning ~ 500ms (non blocking)
 ble.update(400);

// bail if not connected
 if (! isConnected)
 return;


 // send note on
// midi.send(0x90, 61, 0x64);
// delay(500);

// send note off
// midi.send(0x80, 61, 0x64);
// delay(500);

int delay_time = 50;

// increment note pitch
// current_note++;

// only do one octave
// if(current_note > 72)
// current_note = 60;

// Keep in mind the pull-up means the pushbutton's logic is inverted. It goes
 // HIGH when it's open, and LOW when it's pressed. Turn on pin 13 when the
 // button's pressed, and off when it's not:
 if (digitalRead(5) == LOW) {
 current_note = 60;
 Serial.print("Sending pitch ");
 Serial.println(current_note, HEX);
 midi.send(0x90, current_note, 0x64);
 }
 delay(delay_time);

if (digitalRead(6) == LOW) {
 current_note = 62;
 Serial.print("Sending pitch ");
 Serial.println(current_note, HEX);
 midi.send(0x90, current_note, 0x64);
 }
 delay(delay_time);

 if (digitalRead(10) == LOW) {
 current_note = 64;
 Serial.print("Sending pitch ");
 Serial.println(current_note, HEX);
 midi.send(0x90, current_note, 0x64);
 }
 delay(delay_time);

if (digitalRead(11) == LOW) {
 current_note = 66;
 Serial.print("Sending pitch ");
 Serial.println(current_note, HEX);
 midi.send(0x90, current_note, 0x64);
 }
 delay(delay_time);

if (digitalRead(12) == LOW) {
 current_note = 68;
 Serial.print("Sending pitch ");
 Serial.println(current_note, HEX);
 midi.send(0x90, current_note, 0x64);
 }
 delay(delay_time);

// }

}
Wrap-up
I’d love any comments or questions about this project – I will do my best to answer them!
Also, if you have any suggestions for how the Arduino code could be improved or tweaked I’d love to hear your ideas.
Thank you!
5 Comments
ericdano · 29th December 2018 at 01:46
So I am trying to do the same thing as you. I have a Bluefruit Feather M0. I have some SPST switches
https://www.amazon.com/gp/product/B076V2QYSJ/ref=oh_aui_detailpage_o01_s00?ie=UTF8&psc=1
So when I wire it up, I get nothing. I’m using the 3v3 power (it is going to be USB powered). Maybe I am confused on the wiring of the SPST? How do you have power going through this? It looks like the battery is going to ground, and is sometimes diverted through the SPST to DataPins. But I don’t get any readings out of those pins when I connect mine.
anthony · 31st December 2018 at 08:46
Hi Eric. I use mine with a small battery for portability, and then charge via USB. It’s been a while since I needed to work on mine so my memory is a little vague right now. I’ll try and pop the cover off later today to check .
Ericdano · 31st December 2018 at 15:23
No worries. I actually fixed mine. It was a wiring problem.
Though the code you have posted doesn’t work for me. I can’t get it to show up on my iPad. I have some code running on mine that pairs it like it was a keyboard, and then forScore is set to respond to N and P for next and previous. But this way it kills the onscreen keyboard on the iPad when it’s connected. I suppose that isn’t a huge deal if I’m using it on a gig.
Anyhow, I’ll have a write up of it on my site soon.
anthony · 31st December 2018 at 21:40
Cool. Glad you’re making progress. My previous version of my pedal was based on a Bluetooth keyboard inside the pedal, and that too worked by sending keystrokes which had the same limitation you describe where it prevents the iOS keyboard showing up as the iPad thinks it has an external keyboard attached.
Do you have yours attempting to send Midi?
Tom · 11th February 2023 at 21:10
Hey just found all this. I’m trying to build similar and really struggling. Thanks for sharing all of this. I will have a good read and see if I can use it to crack my issues!